
SMT Defect List
From: Author: Publish time:2021-08-31 17:50 Clicks:0
SMT Defect List
SMT Defect List and SMT Troubleshooting (SMT / SMD Problem and Solution)
SMT (Surface Mount Technology), like other SMD Soldering and PCB assembly technology is not ZERO-Defect soldering process. There will always be some or the other defect in any Electronics PCB assembly in both Thru-Hole and SMT.
Here I will discuss some of the most common faults and causes of SMT defects and possible solution and troubleshooting.
Common Faults in SMT:
- Solder balls
- Solder beading
- Bridging
- Open- Insufficient
- Tombstoning
- Unmelted paste
- Excessive filet
- Slump
- Dewetting
- Disturb joint
- Orange Skinning
Solder Balls – Possible cause:
- Solder Paste smearing on underside of stencil.
- What is squeegee pressure?
- Is stencil underside cleaned with a solvent and is solvent still present after cleaning?
- Is stencil proper aligned with PCB?
Solution to Solder Ball Problems:
-
Check squeegee pressure

Solder balls = numerous tiny solder balls trapped along the outside edge of the flux residue
- Check for proper gasketting and alignment
- Check if cleaning solvent is completely evaporated before printing
Oxidised paste – Possible cause
- Was paste shipped refrigerated?
- Did paste spend a long time in a hot area?
-
Was old paste returned to jar?

Solder balls = numerous tiny solder balls trapped along the outside edge of the flux residue
- Was jar put back into refrigeration after opening?
- Is alloy sensitive to oxidation?
Solution to Oxidised Solder Paste Problems:
- Run fresh paste from a different lot under same conditions and see if solder bars go away.
Oxidised paste – Possible cause
- Squeegee pressure too high
- Paste gets squeezed out between stencil and board
Solution: Reduce squeegee pressure
Possible cause:
- Drying out of paste after printing
- What is specified tack time of paste?
Solution: Run a PCB with fresh paste and see if problem goes away
Possible cause:
- Too slow ramp up in reflow profile
Solution: Run recommended profile and see if problem stays
Possible cause:
- Too rapid ramp up in flow profile
Solution: Run a slower ramp up profile to give volatiles to evaporate
SOLDER BEADS – Possible cause:
-
Reflow profile ramp up slow

Solder beading : solder balls that are alongside a components
- Capillary action draws unreflowed paste away from pad to somewhere under the component, it reflows there and form a bead of solder which comes out from under the component side.
Solution: Run a more rapid ramp up profile of 1.5 Degree Celsius to 2.5 Degree Celsius per second.
Possible cause:
- Excessive amount of solder paste on component pads
- What is stencil thickness?
- Are apertures reduced?
- Dispense time for a dot?
Solution:
- Reduce aperture size of stencil or use thinner stencil
- Use smaller needle and/or reduce purge time on dispenser
Possible cause: Paste smearing on underside of stencil
- What is squeegee pressure?
- Is stencil underside cleaned with a solvent and is solvent still present after cleaning?
- Is stencil properly aligned with PCB?
Solution:
- Check squeegee pressure
- Check for proper gasketting and alignment
- Check if cleaning solvent is completely evaporated before printing
BRIDGING – Possible Cause:
-
Cold slumping
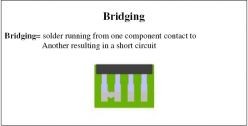
Bridging = solder running from one component contact to another resulting in a short circuit
- Is paste flowing apart after printing, height of deposit reduces and surface increases.
Solution:
- Check viscosity of paste, too low viscosity may result in cold slumping
- Check print speed, too rapid print speed may result in shearing of paste and degrading its thickness
-
Check temperature in printer, too high temperature brings viscosity down

Bridging = solder running from one component contact to another resulting in a short circuit
Possible Cause:
- Hot slumping
- Is paste flowing apart during ramp up part of reflow profile
Solution: Shorten duration of ramp up cycle in reflow profile
Possible Cause:
- Paste smearing on underside of stencil
- Paste can be outside pad area and form solder balls between two component leads resulting in a bridge
Solution – Reduce squeegee and check pcb-stencil alignment and gasketting
Possible Cause:
- Excessive solder paste being deposited on the pads
- While placing a component on the pads the paste is smeared out and may form a bridge to an adjacent pad
Remedy:
- Reduce amount of solder paste
- Increasing print speed may
- Reduce stencil thickness
Open-insufficient – Possible cause:

Opens and insufficient = insufficient or no solder to make a complete bond between the lead and the pad
- Scooping during printing
- Excessive squeegee pressure on a polypropylene squeegee may cause scooping
Remedy: Reduce squeegee pressure or use a harder durometer type of squeegee or use a metal squeegee
Possible Cause: Blocking of stencil aperture with dried up paste
Remedy: Unblock apertures and clean stencil
Possible Cause:

Opens and insufficient = insufficient or no solder to make a complete bond between the lead and the pad
- Foreign material on solder pad
- Was solder mask printed on pad?
Remedy: Use another PCB
Possible Cause:
- Too high squeegee speed
- Paste cannot get into the apertures
Remedy: Reduce squeegee speed
Possible cause: Solder paste viscosity and/or metal content too low
Remedy: Check viscosity and metal content
TOMBSTONING
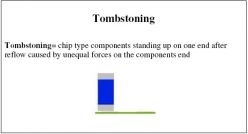
Tombstoning = chip type components standing up on one end after reflow caused by unequal forces on the components end
Possible cause: Unequal placement of components on pads prior to Reflow results in unbalanced solder forces.
Remedy: Check if placement equipment places properly.
Possible cause: Unequal heat sink i.e. ground planes inside PCB layers may draw heat away from pad.
Remedy: Increase soak time (plateau) or reflow profile so that all components are on.
UNMELTED PASTE – Possible cause:
- To cold reflow profile
- Solder paste cannot melt completely
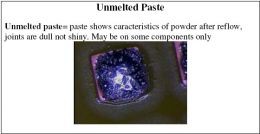
Unmelted paste = paste shows characteristics of powder after reflow, joints are dull not shiny. May be on some components only
Remedy: Check reflow profile, make sure peak temperature and time above liquids (183C) are high enough and soak (plateau) is long enough.

Unmelted paste = paste shows characteristics of powder after reflow, joints are dull not shiny. May be on some components only
Excessive Fillet
Possible cause: Too much solder paste deposited on pads
Remedy:
- If excess solder occurs on all components reduce overall stencil thickness or reduce dispenser purge time
- If excess solder occurs on some places only reduce stencil thickness or dispense purge time for these components only

Excessive fillet = bulbous appearance of joint where outlines of the leads are obscured by the quantity of solder on them
Slump Cold Slump – Possible cause:
Viscosity of paste to low or metal content to low
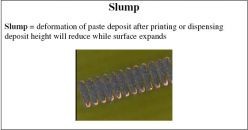
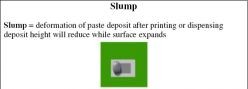
Slump = deformation of paste deposit after printing or dispensing deposit height will reduce while surface expands
Remedy: Use different type of paste with higher viscosity or higher metal content
Possible cause: Paste came in contact with a cleaning solvent or other alien product
Remedy:
- Make sure there are no solvents presents after cleaning the screen
- Never try to revive the paste by adding some compound
Possible cause:
Slump = deformation of paste deposit after printing or dispensing deposit height will reduce while surface expands
- Squeegee pressure to high
- Paste is shearing due to excessive pressure applied to it thickeners in paste are destroyed
Remedy: Use new paste and reduce squeegee pressure
Possible cause: Temperature of paste is too high while printing or dispensing
Remedy:
- Check temperature inside printer
- Reduce pressure on squeegee
- Reduce on pressure on syringe when dispensing
Hot Slump
Possible cause: Too slow ramp up in reflow profile
Remedy: Increase ramp up temperature, make sure to have a ramp up between 2 Degree Celsius to 3 Degree Celsius per second
DEWETTING – Possible cause:
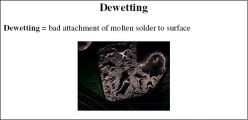
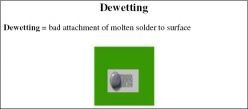
Dewetting = bad attachment of molten solder to surface
- Unwanted material on surface which prevents solder from attaching to surface, i.e. solder mask, fingerprints or oxides.
Remedy:
- Clean boards first
- Use different batch of boards
Possible cause:
Dewetting = bad attachment of molten solder to surface
- Bad alloy in HAL process, i.e. too much Cu elevates melting point of HAL alloy
remedy:
- Increase peak temperature in reflow
- Use different batch of boards
Disturbed Joint Possible cause:
A source of vibration that is transmitted through the pcb during the liquids state of the reflow profile
Remedy:
- Find and fix source of vibration
- Adjust reflow
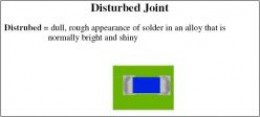
Disturbed Joint = dull, rough appearance of solder in an alloy that is normally bright and shiny
Orange skinning – Possible cause:
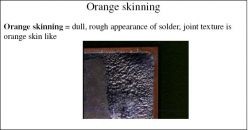
Orange skinning = dull, rough appearance of solder, joint texture is orange skin like
- Too high in peak zone
- Residue is burned or rosin was cooking
Remedy:
- Lower peak zone temperature
Possible cause:
- Too long exposure to temperatures between activation temp and reflow = (depending on alloy)
Remedy:

Orange skinning = dull, rough appearance of solder, joint texture is orange skin like
- Shorten time in soak or lower soak temperatures
Possible cause:
- Preheating too high
Remedy:
- Lower preheat temperatures
Use Nowadays SMT Equipment can reduce the SMT Defect to a very low level:
Automatic SMT Production Line:
PCB Loader➡SMT Stencil Printer➡PCB Conveyor➡SPI➡Pick and Place Machine➡AOI➡SMT Reflow Oven➡AOI➡PCB Unloader➡DIP Component Insert Line➡Wave Soldering Machine➡THT PCB unloader